Showing posts with label sewing. Show all posts

1/21/12

Finnegan the Bear

Close-up
I wanted to do something handmade for Baby Boy for his Valentine’s Day gift, and decided I’d make him a bear.  Up to this point, I had not made any critters for our youngest, though Little Guy has several different ones that I’ve made for him over the past few years (though never a bear).

My Mom had recently given me some yardage of heavy brown felt which she didn’t need.  As soon as I saw it, I just knew it would be perfect for the bear project I had in mind. 

I made my own pattern, sketching out the bear shape I was wanting on a big piece of drawing paper.  I cut out the brown felt for all the big pieces.  I used doll face velour and scraps of felt for facial features (all from my stash).  I did buy a fat quarter of brown stripey cotton for the ears, tail and belly, but everything else I already had.  I stitched him up on my machine (except for the tail, and the belly, which I did by hand).  The belly part covers the opening I used to stuff him. 

He’s cuddly and should be machine washable.  There are no buttons or other bits that Baby Boy could choke on.  Total cost was $1.99 which is what I spent on the one fat quarter.  This took maybe four total hours to complete.  Overall, I think he is a success. 

I call him Finnegan, and I hope he makes my Baby smile. 

Front View

Rear View


12/30/11

Hand-Made Christmas, Part 3 (Dr. Who)


As I mentioned in my last post – Hubby and I decided this year to make each other gifts this past Christmas. 

In addition to the wall hanging featured in that previous post; I also made a small plush Dr. Who for Hubby.  If you don’t know the Doctor, he’s kind of hard to explain.  A British television series that has spanned decades, and follows a fantastic and funny time traveler as he has adventures all over time and space.  Hubby’s favorite incarnation was the fourth doctor – played by the talented Tom Baker.  His version of the Doctor was quirky and fun and known for a ridiculously long scarf, among other things. 

I used a photo of the 4th doctor that I found on the internet as a rough inspiration and free handed the body (using doll face velour).  I also free handed the clothing and stitched up as much as I could on my machine.  I used a doll needle and embroidery thread to make the eyes and the little smirk.  All of the clothes are made from heavy duty felt, except for the vest which was made from a scrap of plaid wool from my stash. 

I didn’t have to buy anything to complete this project.  It took me the better part of three hours to cut out, assemble and sew the whole thing.  I’m very pleased with this, and am fondly calling it “Dr. Who felt art”.  Hubby keeps it atop his dresser next to the little ninja I made for him last year (long story there which I’ll save for another day).
Here he is without the little scarf...

and Tom Baker as the Doctor... my inspiration for this project!

12/29/11

Hand-Made Christmas, Part 1 (Fire Hose)

Today I was looking through the photos of our boys this Christmas.  Surrounded by upended boxes and scraps of wrapping paper, my three year old is beaming over one toy or the other in every picture.  As is always the case, he got more than he needed – but oh was he happy!  The majority of his gifts were store-bought.  The one exception being a fire hose, which I made for him to go along with his new fireman suit (we LOVE fire trucks and firemen at our house).  I used scraps that I had on hand, so there was no cost.  It turned out to be one of his favorite toys of the day, so I definitely feel that it was worth the time spent to put it together.

I personally adore hand-made gifts.  My family has been exchanging them for years (for as long as I can remember really), and those little things made with love stand out as my favorites.  Did I love the store-bought dolls and other toys?  Of course.  But with the exception of my beloved Mandy and Jenny, I don’t have any of them now.  The hand-made items though…those are ones I kept.  They each hold a special place in my heart and always will.  I hope my children will always appreciate things made for them with love, and never close themselves off to the idea that price doesn’t have to have anything to do with value.

The fire hose is made from a long piece of heavy-duty black fabric (which in a prior life was part of a conveyer belt), a plastic drinking cup, lots of duct tape and some blue yarn.

Above is a picture of Little Guy in full-out fireman mode.  I found the hat at a garage sale for 50cents, the jacket on eBay for $5.00, and the boots at a children’s consignment store for $6.00.  I also bought a ‘fireman accessory pack’ at our local dollar store for $1.  It included pretend versions of: an axe, a walkie talkie, a badge, and a mini fire extinguisher.

He loves his fireman gear, but of course as soon as he’d put it all on – he asked where the fire hydrant was?  I told him we didn’t have one, so he promptly grinned at me and said, “You can make it for me Mom.”. 

Guess what’s on the craft agenda for this week?  haha  I guess, that at least for now, my Little Guy is just as big a fan of home-made gifts as I am.

12/10/11

Christmas Stockings

We’re Boston Red Sox fans, and our family room is all decked out in Red Sox everything.  The family room is where our fireplace is, so when it was time to make Little Guy’s Christmas stocking three years ago, and when it was time to make Baby Boy’s for this year…the theme was easy to choose.  Both are made of heavy duty felt.  The designs on the front were cut from the same type of felt based on a free-hand sketch. 

The circle with the sox within did take quite a bit longer than the big “B”.  Four nights of my free time (translation: whatever time I have between when the boys go to sleep and I do) was spent working on this.  I’m pleased with how it turned out.  I wanted something that was similar to LG’s without being to matchy-matchy.  I’m pleased with the results.

Note: I did tweak the photo a bit (obviously) to remove the names of my boys.  The names are actually big block letters (same heavy duty felt) that I sewed on by hand.

11/28/11

Baby Boy's Quilt

I’m a little behind schedule, but did finish Baby Boy’s quilt this week. This one is similar in style to the one I made for Little Guy before he was born (2008). My original intent was to have this new one done before Baby Boy was born this past summer, but reality smacked me around a bit, and that is why he’s only now getting it when he is four months old.

The inspiration for both quilts is one that was made for me when I was a baby by a dear family friend. It featured an arrangement of squares, each with a whimsical painted animal, and those squares were all bordered by a print fabric. I wanted to do something a little different for the backing on these, so both of the quilts I made are backed with vintage white chenille (think bedspreads from the 1960s). I know it's a little unorthadox, but it turned out pretty great.

For the animal paitings on both, I used Aunt Martha’s brand iron on transfers to affix the designs to white fabric squares. My Mom used Aunt Martha’s brand fabric paint to color them, and then I pieced the fronts. I quilted the pieced layer to the chenille backing (using my Brother sewing machine and a low loft batting). I embroidered a label for each quilt which details the full name, birth year and a special Bible verse for each. The Bible verses were selected by my Grandma (for Little Guy’s) and my Mom (for Baby Boy’s). The labels are sewn to the backs of both quilts.

Aunt Martha's Note... the quilt made for me in 1974, and the ones I made for my boys all share a few of the same animals. Clearly Aunt Martha knows not to mess with a successful design!
The end result is a nice little family memento in addition to being a cozy and warm quilt, perfect for cuddling or spreading over a toddler’s bed.

When I started taking pictures of Baby Boy with his quilt, Little Guy drug his out for pictures too…which is why both are shown below.


7/7/11

Keepsake Projects

Here are a few of the little things I’ve been working on lately to keep myself busy, while waiting for the arrival of our new Baby Boy:

I wanted to make the new Baby some blankets. I’ve put all of Little Guy’s special baby blankets in storage so that he can have them as keepsakes when he’s older. I want Baby Boy to also have plenty of keepsake blankets, so I’ve been on a mission. You may recall the retro rocket blanket I made a while back. Now, I’ve added a dinosaur blanket (orange flannel backing on a basic cotton print – all fabric from JoAnn’s):


And a puppy dog blanket, which I appliquéd “AJ” (Baby Boy’s initials) for a fun fold-down effect. The orange in this picture looks odd. It actually matches the orange “woof woof” printed on the fabric. This one is flannel front and back, so will be a little warmer than the dino one. (The doggy print came from JoAnn’s. The tan flannel has been in my stash forever).


In keeping with the whole keepsake theme…. I also have been re-working the much loved sock monkey from my own childhood, to give to Baby Boy. It was made for me in the 1970s by a dear family friend. This little critter survived years of love and use and moves, but just barely. I’d actually looked for it when I was pregnant with Little Guy, but had never found it. Little Guy did receive a sock monkey which was made for him by a family member (who also happens to be a dear friend) - so he didn't miss out.

By chance, I came across my old sock monkey on a recent visit to my parents’ house. He was floppy, missing lots of his yarn embellishments and needed a general freshening up. I did a little surgery on the back of his neck, added a lot more stuffing and then replaced all the red yarn that had faded or disappeared over the years. Now both of my boys have sock monkeys with great loving back stories.

Before

After
I'm also putting the final touches on the quilt I'm making for Baby Boy.  I'll post pics once that is complete as well.

5/20/11

Little Guy's Cowboy Quilt

Last month, I finished the twin quilt I’d been working on for a while. Technically, if you count fabric selection…it’s been in the works for almost three years. When LG was just a tiny baby I started to buy bits of cowboy themed fabric wherever I ran across it - with the goal of an eventual twin bed size quilt in mind.

This cowboy quilt has been a really fun project for me. I didn’t use a pattern, but chose a basic four-patch design which I knew I could handle. I used a low loft batting and a solid navy blue fabric for backing. I went with blues and reds to accent the cowboy fabrics because they seemed like colors that could withstand whatever wear and tear our Little Guy might put them through.

Someday I’ll do some more hand quilting, but this project was done 100% on my sewing machine. I also tied off the centers of each four-square block. The ties weren’t necessary, but reminded me of the first twin size quilt I ever had (and still have now) which was made by my Grandma.

Luckily for me, I also found some cowboy themed sheets at a garage sale last summer, making the overall look really come together (I think). The day these pictures were taken, was the day Little Guy’s new bunk beds were delivered (giving us time to set his toddler bed back up as a crib before the baby is born).

Look closely... Little Guy is peeking out from behind his stuffed dinosaurs.

I’m never going to win any quilting contests, but I do love the process: from picking out fabrics to finishing the final stitches…it’s like putting together a puzzle that you don’t have a picture or box for. Pure fun, if you ask me.


This is the second twin size quilt I’ve made (my first was a Superman themed one for my little brother back in 2001). I’ve made a number of baby quilts and a lap quilt or two. I’ve never taken a class or had any formal training. What I have done instead, is read a lot of books on the topic, and carefully examined the family quilts which I love the most. Those quilts I have which are most dear to me are what I consider true patchwork. They were assembled with squares cut from old dresses, work shirts and feed sacks. They are not perfectly color coordinated, but they were clearly made with love.


When Little Guy outgrows this quilt, or decides he needs something else, it will be carefully stored away. Maybe someday one of his children or grandchildren will be able to use it too. One of the many things I love about quilts is how they can be handed down from generation to generation, and loved by each.

My quilting focus has now moved to the crib quilt I’m working on for Baby Boy. Then it will be time to start collecting fabric for HIS first twin quilt. Right now…I’m thinking maybe his will have a space theme (planets, rocket ships etc.) but time will tell.

4/11/11

Baby Bibs

When Little Guy was just a wee baby, we used bibs that we had purchased or which were given to us. They were cute, and served the purpose, but none were all that special. This time around I decided to take a stab at making my own.

I took a couple of our favorites that we had saved, traced around the edges to make a pattern, and then used some bits of cutesy flannel that I had in my stash (some adorable Michael Miller and a cute chicken print from JoAnn’s).


I had a quarter yard of each, and with that amount was able to make a large “eating” bib, and a smaller “dribble” bib with each of the three fabrics. I had the thread and snaps on hand too, so this project cost me nothing. It was a lot of fun and I hope that Baby Boy gets a lot of use out of them. I’ll probably make more too, as time permits.

For now though, I need to concentrate on finishing two quilts. One is for Little Guy’s transition to his first twin bed, the other is for Baby Boy’s nursery. I’ve started both (and really am probably half way done with LG’s. I need to get motivated and get them finished. THEN I can maybe make some more cute bibs.

The motivation has been elusive these last couple of weeks, so we’ll see.

3/14/11

Baby Boy's First Blanket

When I was expecting Little Guy, I splurged on one item.  It was an adorable baby blanket made with a fun Michael Miller retro cowboy fabric, backed with minky chenille.  I found the blanket on eBay and bought it right off.  In hindsight I should have done a little research and tracked down the fabric to make it myself. Oh well.  I loved seeing my tiny boy wrapped up in his little cowboy blanket, and he still uses it at nap time on occasion.  It was worth the splurge.

So, when we found out about the new baby, I knew I wanted to make something similar... I went to Etsy (never knew about that lovely site three years ago, but it's now a favorite!)  I found another retro Michael Miller fabric (this one features space ships and little child astronauts).  I was able to purchase one yard for a great bargain price, and decided to use a vintage chenille bedspread (in pale yellow - from my fabric stash) as a backing.  Total time to finish the project was maybe an hour.
Gathering the supplies...
The end result is really quite adorable, and the total cost of this blanket is less than one fourth of what I paid for Little Guy's cowboy blanket.  I sure hope my new little munchkin loves his blanket as much as Little Guy loves his.
The Final Result.... I love it!  What do you think?


3/6/11

Monkey Business

I was recently approached by a friend with a request. She will soon be a happy Grandmother to a sweet baby girl named Ava. The baby shower invitation featured a cute little cartoon monkey, and my friend asked if I thought I could create a plush version of the critter on the invite.

I told her I’d give it a try.

I used brown chenille (left over from an earlier baby blanket project) for the body. For the face I used doll face craft velour. Sewing the velour to the chenille proved challenging, and it took me much longer than expected to get the face attached (evenly). I attempted to put a “belly” on the monkey too with the same velour, but it wasn’t working. I made a design decision at that point to not give the monkey a belly or ear detail. Otherwise, I think that this worked out okay.

Front View:


Back View (note the frilly diaper back):


Showing the Invite I worked from:

11/12/10

Crazy About Dinosaurs!

Boys love dinosaurs, and my Little Guy is no exception.

He loves books about dinosaurs. He loves for us to draw him dinosaurs. He likes to pretend he IS a dinosaur – “ROOOOAR!” He likes dinosaurs on TV (“Dinosaur Train” is a fairly silly show, but is a new favorite).

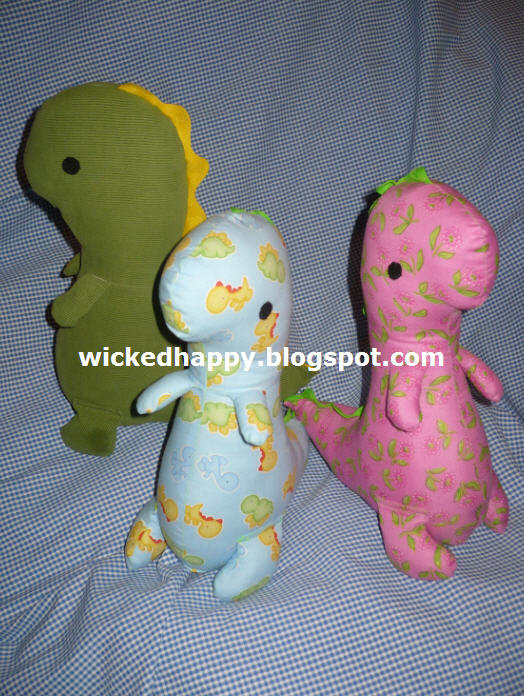
The one thing he didn’t have was a cuddly dinosaur, one he could take with him to bed and snuggle with while he sleeps. So, I set out to make one for him. At first, I was just going to cobble together my own pattern. I have done that before with some success and probably would have this time, except that I stumbled upon bitofwhimsydolls.com. They sell lots of dolls and stuffed animals. Most are available as a pattern or as a finished product. I ordered the pattern (for Tommy T-Rex), and couldn’t be happier.

I first made one out of green corduroy. It didn’t turn out exactly as I’d hoped, but I’m going to blame the fabric. The corduroy just didn’t have the give that cotton does. The end result was still super cute, but I wanted to make another. So, for my second attempt, I used some pink printed cotton and made a cute girly dino for a friend’s child. I had assumed my dino-making days were over (for now at least) but then I found the cutest dinosaur printed fabric at JoAnn’s (their brand), and made one more.

Then I made a mistake – a fairly big one. I had all three of these stuffed little fellows out on the table and was in the process of putting them in clear plastic bags (for storage and/or eventual shipping) when Little Guy walked into the room. Silly me - I had thought he was occupied with Hubby elsewhere. My mistake. As soon as he saw them, he squealed “MY Dinosaurs!” and hugged them all to his chest in glee. I was able to pry the pink one away (she had an alternate destination after all), but ended up letting him keep the other two. He plays with them a lot more than his other stuffed animals, and they go to his crib with him every night. I asked him what their names were, and he answered “Dinosaur Train”. Clearly he doesn’t really understand the art of naming stuffed animals yet, but for now we have Dinosaur Train 1 and Dinosaur Train 2 (see images below)….

I knew for sure, that these little guys were a hit when I came into the family room one night and there sat Little Guy in front of a towering stack of blocks. One of his dino buddies was sitting next to him. Little Guy turned to the dino, shook his finger toward him and said, “Don’t knock down tower!”. Then he proceeded to take the dinosaur and knock the tower down. There was much roaring and giggling. When the tower was no more, Little Guy gave his dinosaur a time-out. How cute is that?

Regarding the pattern, I want to tell you that it was maybe the easiest pattern I’ve ever used, and I felt it was affordable, and ordering it was a breeze. The pattern was clearly written and illustrated with great photo examples. Copyright terms were clearly explained, and the whole thing was very user-friendly. I will certainly use this pattern again in the future. I strongly recommend that you visit bitofwhimsydolls.com and check out the awesome selection of finished items and patterns. I say this only as a very satisfied customer. I am not being compensated for this blog post about bitofwhimsy.

10/21/10

Happily Ever After... And a Donkey

Today my Mom and Dad celebrate 38 years of wedded bliss. They offer Hubby & I a very wonderful example of how a marriage can work, and work well. These days, happy unions seem to be in the minority, so it is very refreshing to see a successful one. They’ve had their ups and downs (who hasn’t?), but they have always persevered. Maybe it is their faith. Maybe it is their unwavering love. Maybe it is just plain stubbornness. Maybe it’s a combination of all of the above. Whatever it is, I can only hope I’ve inherited their ability to always work things out. (so far, so good!)

For their anniversary I usually try to give them something unexpected or home-made (or both). Typically, these gifts are a little bit corny or silly (okay, almost always). My family is a bit corny and silly though, so it works.

This year I’ve been dabbling in making softy toys. Recently I came across a pattern for a donkey. It was in an old 1970s craft book that I found at a garage sale. I wasn’t sure if it would turn out or not, but wanted to give it a try. I knew that if it was cute enough, I’d have to give it to my parents, as they are now the proud owners of Lucinda the donkey.

I have a stash of wool yardage, and one bit in particular is a lovely shade of grey that I thought would be perfect. For her mane, I used the blue yarn left over from when I made my Grandma’s Afghan. I cut out the pieces as directed, and then struggled a little bit with how to assemble them (not the greatest of instructions). Once I’d figured that out, she came together easily. I made a little blanket out of some leftover fleece and felt. Her bridle was made from a little scrap of trim that had been buried in a box of sewing notions we found at an auction. So, as with most of my little projects, she cost very little to make. In fact, the only true cost was what we spent at the printers, expanding the pattern to the correct size.

She’s about a foot tall, and though not perfect - I am very proud of the final result. I think I’ll be using this pattern again for sure. I gave her to my parents on Saturday while we were visiting them, and they were tickled with the gift. So the project was, in my opinion, a braying success.


Happy Anniversary Mom & Dad!  I love you guys.  :)

10/6/10

A Keeper of Things


The above Clutter cartoon found via Bing! Images
Many, many years ago (when I was a silly teenager) I often teased my Dad about his massive collection of STUFF. In hindsight – who did I think I was - making fun of anyone? To put my teenage years in perspective…think George Michael posters, peg-rolled frosted jeans, enormous bangs & braces on my teeth. But I digress. I teased him because he saved everything - and I do mean everything! If you walked into his barn or his little workshop, you would be greeted with towering stacks of boxes and crates and chunks of wood. His tool bench always seemed orderly, but it was surrounded by a steadily evolving halo of chaos. For some reason this irked me.

“Why do you save all this junk” teenage Me would ask.
“It’s not junk, Young Lady.” He would patiently reply. “I have plans for all of it.”
“But how will you ever find anything when you need it?” I would whine.
His patient, but firm reply would be, “I know where everything is. I have plans for ALL of it.”

Fast-forward twenty years, and that conversation could just as easily be reversed if my Dad took a peek into my craft room. You see, I too have become one of those folks who keeps everything (especially of the craft and sewing supply variety).
He might, for example, hold up a box of mis-matched bits of colorful cloth and ask, “Why don’t you throw this junky old fabric away?”
“That fabric is vintage feed sack material. It’s not junk, and I will use it in a quilt.”
“What about these canvases, or these bags of felt, or this jar of buttons, or this dresser full of fabric?” He might go on and on, and I’d probably be defensive by this point.
“I have plans for ALL of it!” I’d cry.

And I do. I have more projects in my head (and corresponding supplies in my craft room) than I will probably ever have time for. And yet…I keep looking for more.

This past weekend we went to a big flea market. I have been on the lookout for green corduroy (I want to make a stuffed dinosaur for Little Guy for Christmas), and found a good quality twin size bedspread in green corduroy (circa 1970s) for just $1.00! Woo Hoo! And imagine my excitement when I found an orange one right next to it, also for $1.00. Yowza! Did I plan to buy orange corduroy? No. Do I have a plan for this new orange fabric? Well, I didn’t until I saw it hanging there on that lonely hanger. My mind began to race, and now I have several ideas for what I’ll use it for…someday. So, into the stacks it goes.

My keeping things is really the product of another trait that I also share with my Dad: We like to save money. Call us cheap or frugal – we are always interested in finding a bargain. It’s this need to pinch pennies, that sends us scurrying to garage sales and flea markets before ever looking for things we “need” in retail stores. It’s the feeling that we can’t pass up a great deal, even if we have piles of other great deals at home, just waiting to be addressed.

Regarding that halo of chaos that I once poked fun at my Dad for: I have tried to keep my own disaster area (craft room) in check. I get it now. I understand that there can be order in disorder (well, to some extent anyway – Hoarders scares me).  But I also know that a little chaos is okay.  You just have to know your limit.  (I know mine, by the way.  I just haven't reached it yet!!)

Now, when I poke my head into my Dad’s cluttered workshop the conversation will go something like this:

“Oooh, what’s this one for?” I ask as I pick up a strangely shaped item.
“It’s going to be a birdhouse, I think.”
“What about this old medicine chest?” I ask, pointing.
“I’m going to restore it.” He answers.
“Nice! How about these tiles?” I stroke the dust off the stack and he eyes me suspiciously. “You don’t really plan to use these for anything do you?” I ask, sending him the little girl puppy-dog eyes, “Because I think I could…”
“Don’t even think about it, Young Lady! I have plans for everything you see! Don’t you have some stuff of your own to go through?”

And I’ll laugh and nod… because I certainly do.

10/4/10

Hootie PaTootie

My latest creation is this little pink hoot owl. She’s soft and sweet and kind of girly.

I made my own pattern (so this first one is a prototype). I’ll make some tweaks when I use this pattern again. I used my machine for the seams, but did the facial and belly accents by hand. She’s made mostly of fleece with felt accents and stuffed with fiber-fill. She’s about 11” tall (not counting her little feet).

Why did I make a pink owl, you ask? Well, someday I hope to open an Etsy shop, and this is the first thing I’ve made to store away until I have enough stock to make Etsy worthwhile. I don’t know what (if anything) I’ll specialize in. I like to dabble in everything, so I anticipate offering a variety of items when the time comes.

Hoot  Hoot!


9/29/10

Projects & Pretties

I’ve been a busy little bee lately. That week where I didn’t have a sewing machine, I finished the afghan for my Grandma (Christmas Present) that I started last winter.

Once the new machine arrived, I dug into the towering pile on my project table and finished a baby quilt (flannel & chenille), a baby blanket (also flannel & chenille – but bigger and not quilted), a throw pillow for the chair in Little Guy’s room, AND two toddler-size pillow cases - one for Little Guy, one for a friend's daughter.

So, I’ve been busy with everything except posting pictures here. So now I’m trying to catch up. See the snaps below for a glimpse.

In progress are a second baby quilt (similar to the first one), and two Christmas gifts which I can’t detail here as the recipients are readers of this blog. ha ha

Little Guy's Pillow Case.  The one I made for a friend was girly with little monkeys and bananas all over.

Afghan for Grandma

Baby Blanket commissioned by a friend

Baby Quilt for a friend

Throw pillow for the rocking chair in Little Guy's room.  The fabric is a Michael Miller cowboy print that I love.

9/22/10

Meet Sohpie

So we looked all over for a new sewing machine after my beloved (though ancient) Singer bit the dust a while back. Because we are frugal folks, we first looked at garage sales, tag sales and Craig’s List. We looked into repair, but decided that wasn’t the right route to take. Minimum repair cost was to be $60. Ten years ago, my Dad bought me the machine at a garage sale for $3. We decided I’d more than gotten his money’s worth.

However, the perfect used machine proved elusive. Well, elusive in the short span of time we had to spare searching for it. I have a stack of sewing projects that need to be done soon, and I didn’t think I had time to tackle them by hand, unless my goal date could be moved to next Christmas? No, that wouldn’t work. I needed a machine.

**sigh**

So one night this week, my hubby (who for the record, is AWESOME), called me to his office in our basement. He pointed to his computer and said, “Pick the one you like”. On the screen was a website which displayed a lovely array of brand spanking-new sewing machines.

My pulse quickened.

My palms became damp.

I couldn’t contain a silly grin as I sat down to peruse the options before me. There were a variety of prices, styles, brands and features. I had a rough idea of the features I most wanted in a new machine. I knew I wanted all the basics, as well as extra decorative stitch options and a drop feed for free motion quilting. Before long, I found the machine that seemed to meet each one of my criteria. The price was right so we placed the order.

It was delivered last night. I’m so happy I could burst.

Here she is: The Brother model CS-6000i computerized sewing machine. I call her Sophie (as in SEW-fie). 
Isn't she beautiful?

I unpacked the box, read through the instruction manual, set everything up and started sewing (you’ll see pics of my first project later in the week hopefully). I pulled myself away when my eyes started to get droopy. If I didn’t have a family and a day job I might have just sewn all night. As it was, I packed everything out of reach of two year old hands and headed to bed…where I dreamed of bobbins and seam rippers and presser feet and double needles.

To paraphrase an old movie classic, “Sophie, I think this is the beginning of a beautiful friendship."

LinkWithin

Related Posts with Thumbnails